Timm’s BMW M60 and M62 Engine PCV Valve Replacement ( E31, E32, E38 and E39)
The M60, M62 and M62TUB V8 engines used in the E31 840i, E32, E38 and E39 all suffer from PCV valve failure when they reach a certain
age. The PCV is a pressure regulating valve for the crankcase - it keeps the crankcase at a constant vacuum of a few millibars and is fitted to
the rear of the inlet manifold. When this is damaged it can cause erratic idling, a howling noise from the rear of the engine, oil leaks from the
valve covers and excess smoke. Often mistaken for Nikasil problems on the M60 engine the repair is pretty straight-forward but does require
a bit of patience especially when trying to get the Torx bolts out of the PCV. More information can be found here.
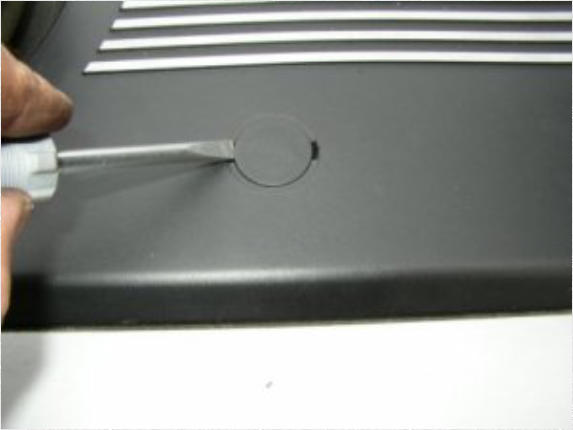
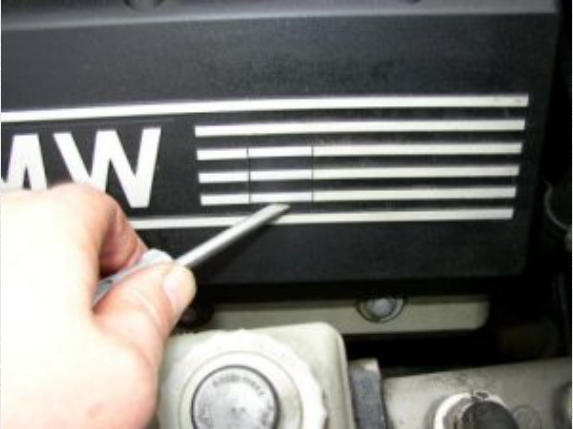
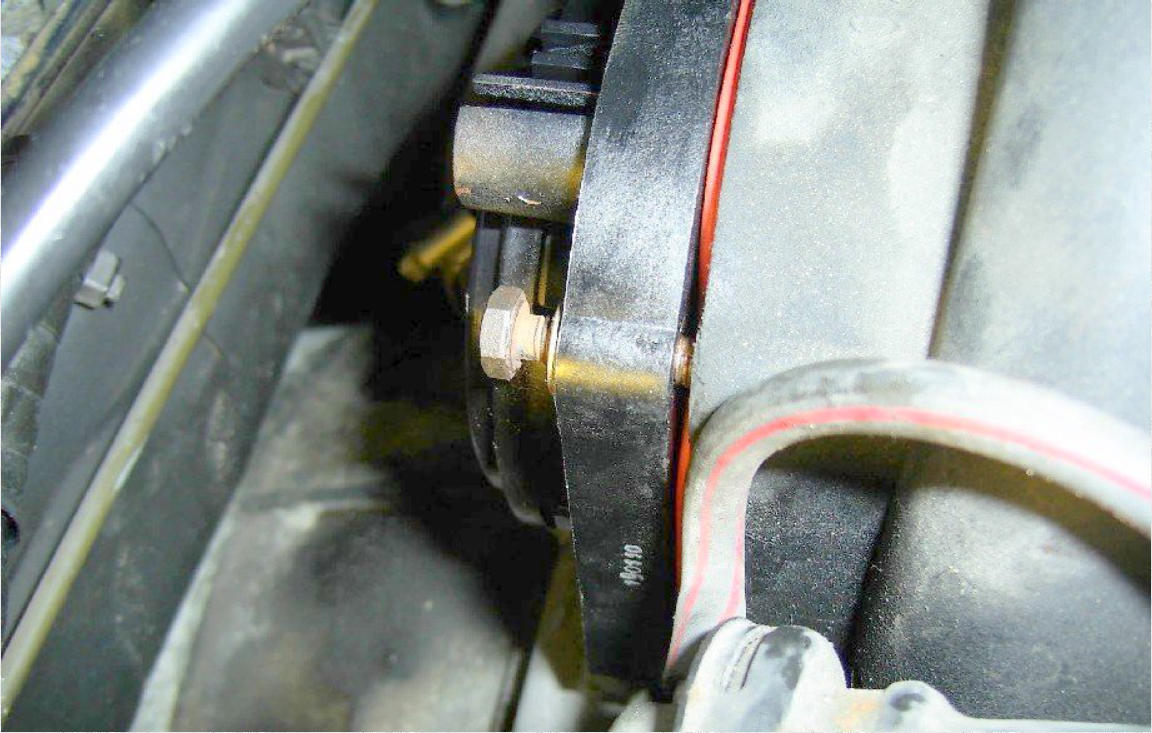
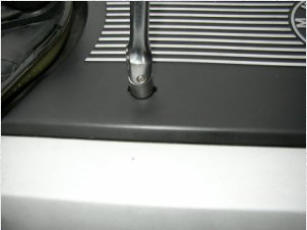
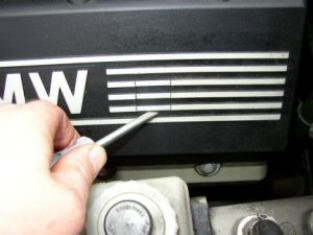
Start the repair by removing the plastic engine covers, the fixings are found underneath the small covers and are all 10mm nuts. Start with
the top cover and then remove the side covers. The E38 has push-buttons instead of 10mm nuts.


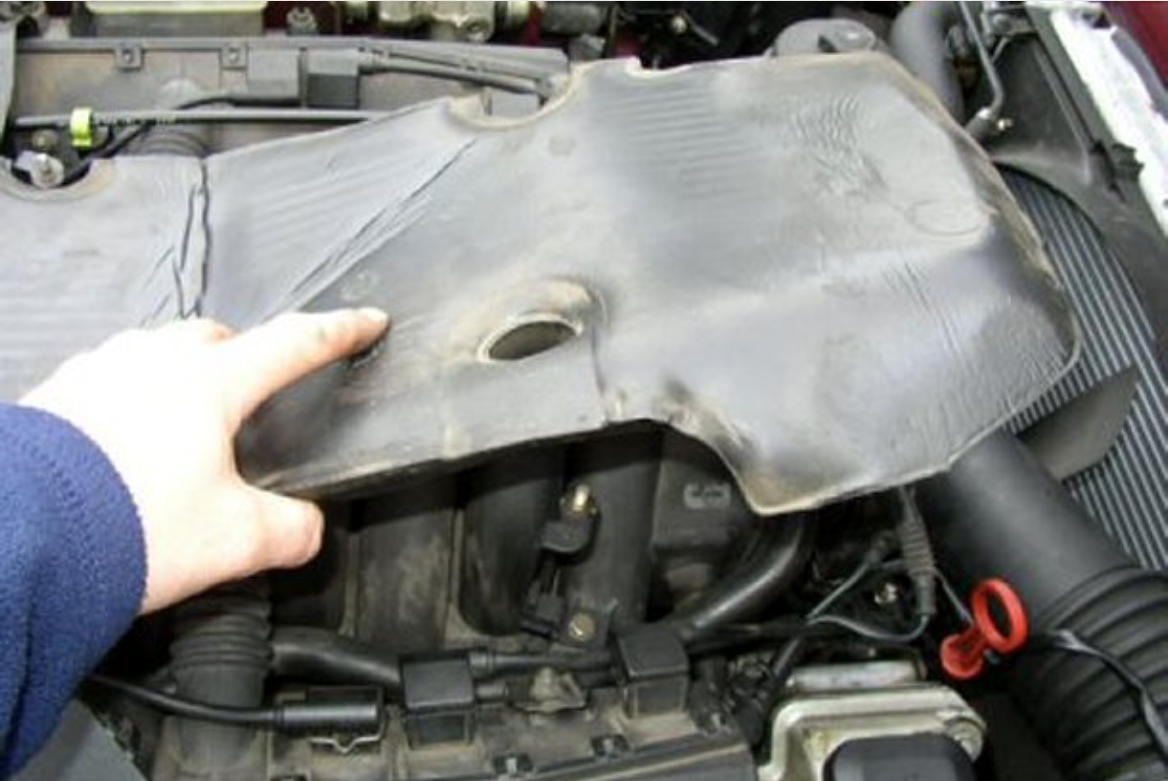
Remove the soundproofing from the top of the manifold....
ADDITIONAL STAGES FOR BMW E31 8-SERIES
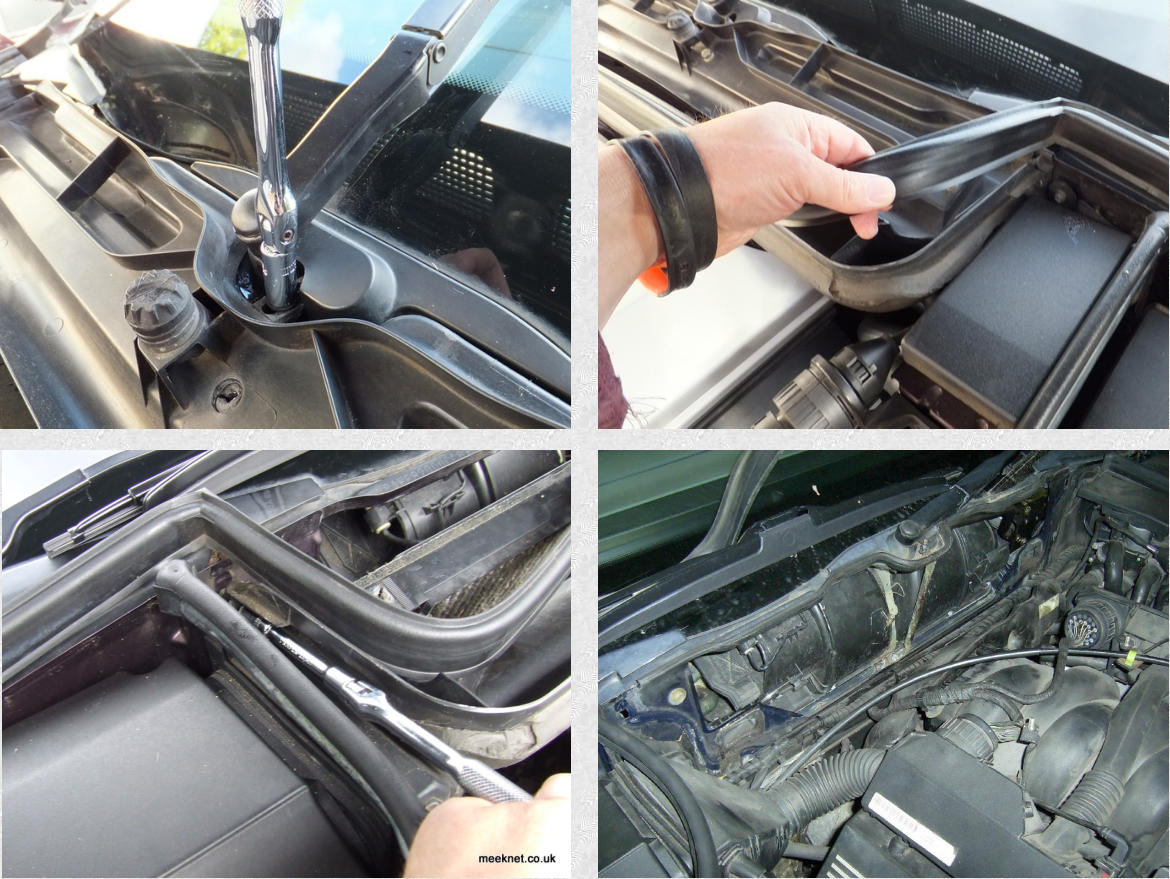
Remove microfilter housing by removing central conical nut and then removing 2 x 7mm self-tapping screws
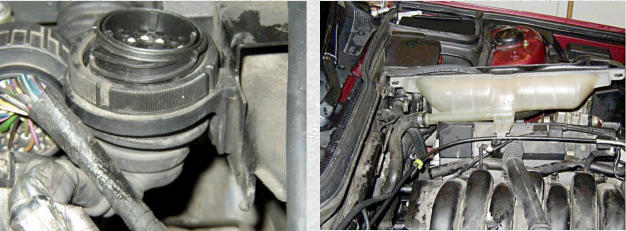
E32 only: Access to the nut that holds the coolant tank is obstructed by the diagnostic connector so remove the cover along with the
security strap, loosen the big plastic nut and drop the connector down enough to get to the nut (10mm plastic self tapper). Disconnect the
pipe that connects to the right top of the expansion tank (push fit), undo both plastic nuts and move the tank off to the left hand side of
the engine bay (no need to drain the coolant).

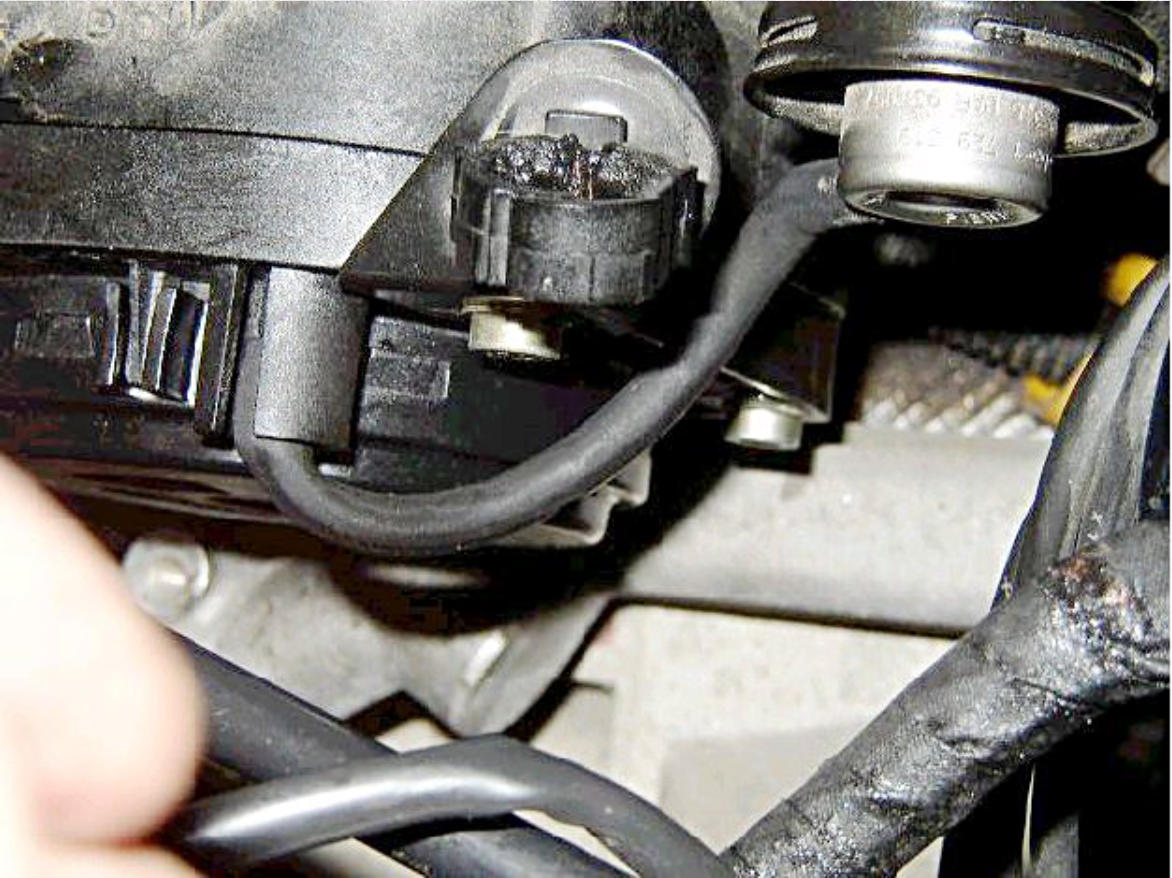
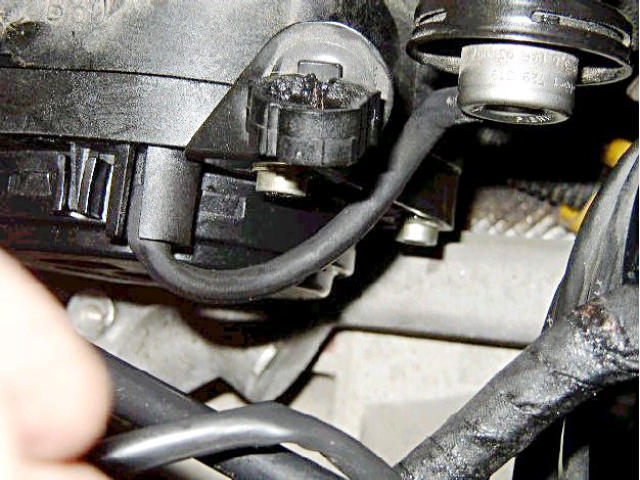
Disconnect the large loom that goes to the right hand wiring bank above the injectors and unclip the loom from this mounting just above
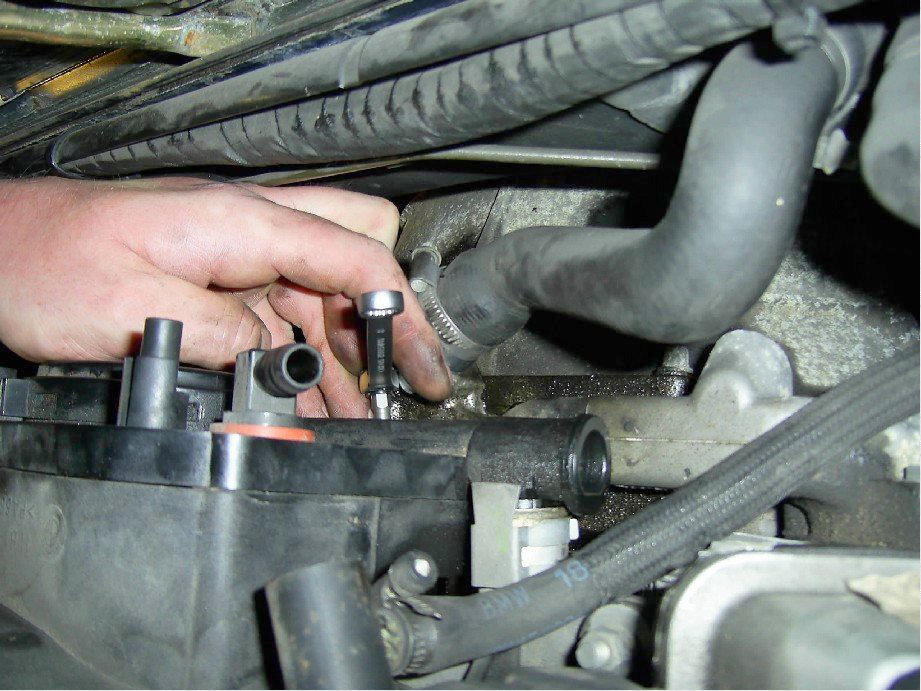
the PCV. Remove the squashy-rubber insulator from behind the PCV, it's a bit fiddly but it comes out quite easily without tearing it (found
on E32 only). The picture also shows the vacuum pipe that runs from the fuel-pressure regulator to the PCV, I have replaced this pipe
as the old one was damaged, squashed and had a hole in it....
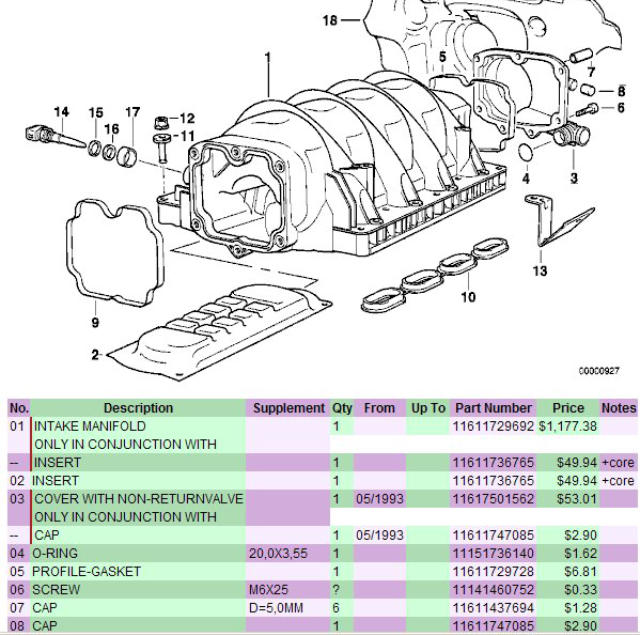
The diagram below shows the manifold and PCV valve at the rear. You can see the Torx bolts (6) than need to be removed. This is the most
tricky part as there is little access to the bolts. There are small differences between the PCV and manifold on the M60 and M62 (the picture
below is for the M60) but removal and replacement is essentially the same except there is an internal vent pipe that needs to be fitted to
the PCV during replacement:

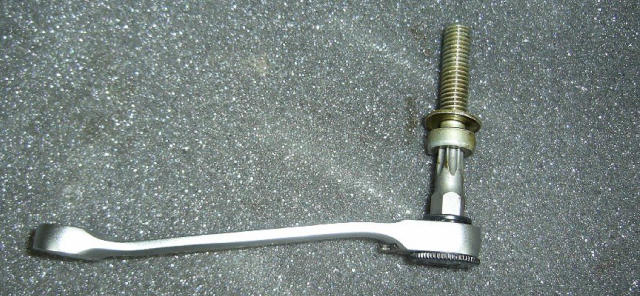
Right, we’re ready for the tricky bit, removing the six Torx bolts (there has been some discussion if these bolts are actually Ribe and not
Torx, but, a T30 Torx fits perfectly. It is extremely important that the Torx driver you use is of good quality, it must fit tightly in
the bolt - if there is any play at all the heads will strip - don’t just have a go with a worn driver, they will not come out and you
will damage the bolt

The lower-left bolt (on the E32) could only be undone using a pair of mole-grips holding the Torx bit (don't try a
spanner, the bit drops out and you won't find it again).....
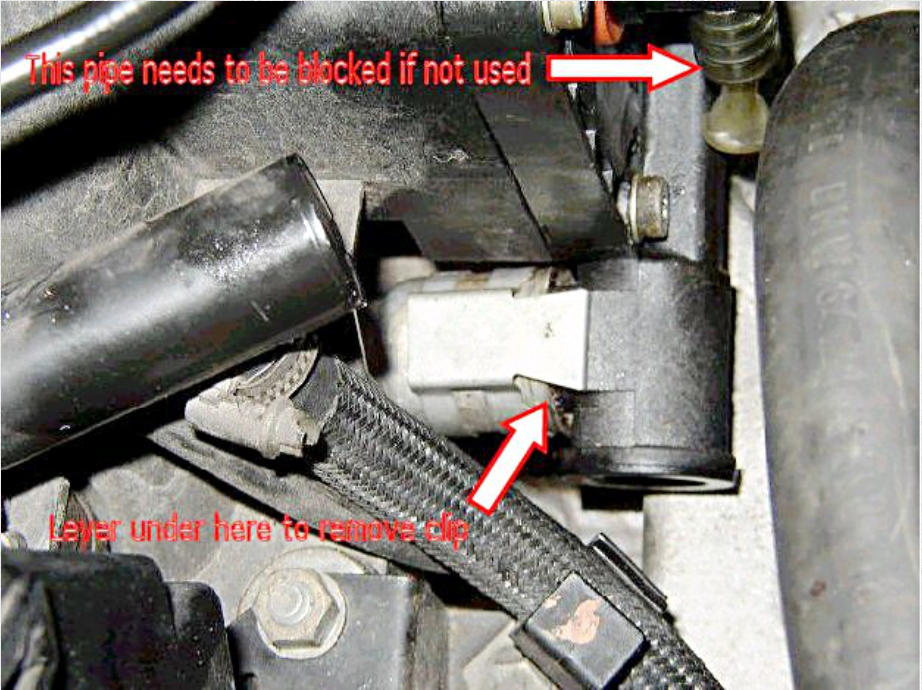
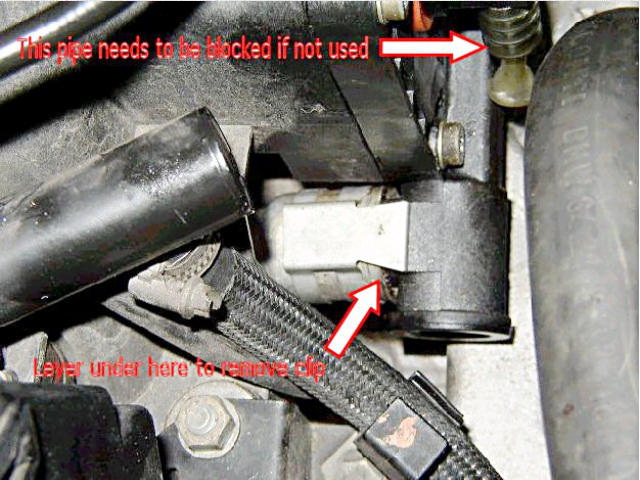
The picture below shows the clip that holds the breather pipe to the PCV, lever this upwards using a short screwdriver while holding on to it,
you won't want to lose this between the cylinder heads....The clip is slightly different on the M62TUB. The picture also shows an additional pipe
that is fitted to the new PCV, this needs blocking off on the 730i's but is used on the cars that have a vacuum brake booster for the brake
system, I used a blind grommet which fitted snugly which was then covered in heatshrink and shrunk in position for security...
EDIT: Quite a few people have had problems getting the Torx screws out from the PCV. The most important point is to use a quality Torx bit.
It must fit tightly in the head of the bolt, if it wiggles around you have very little chance of getting a good enough purchase on the bolt. Only
put pressure on the bit when it is properly seated, too little pressure and the Torx will round off. f you are in a situation where you just cannot
get the Torx bolt out (if, for instance, the Torx head is damaged) then there are a number of possibilities. Most successful so far seems to be
to melt the PCV using an old soldering iron so that access can be made to the errant Torx bolt (this is usually the one at the bottom at the
passenger side). Melt enough away so that you can get a drill in there........drill a hole across the bolt and fit a self-tapper in the hole. Then
use a pair of Mole-grips to turn the head of the bolt.
I have heard of people whacking the PCV into submission but be warned that the manifold is made of the same material and may well give up
at the same time. The Torx bolts are sleeved which means that even after you have completely demolished the PCV you will still be left with a
Torx bolt in a sleeve. I'm always happy to hear of your own method of getting these bolts out......my best tip is: Buy a brand new high quality
Torx bit....for a fiver you are at an advantage to start with.....
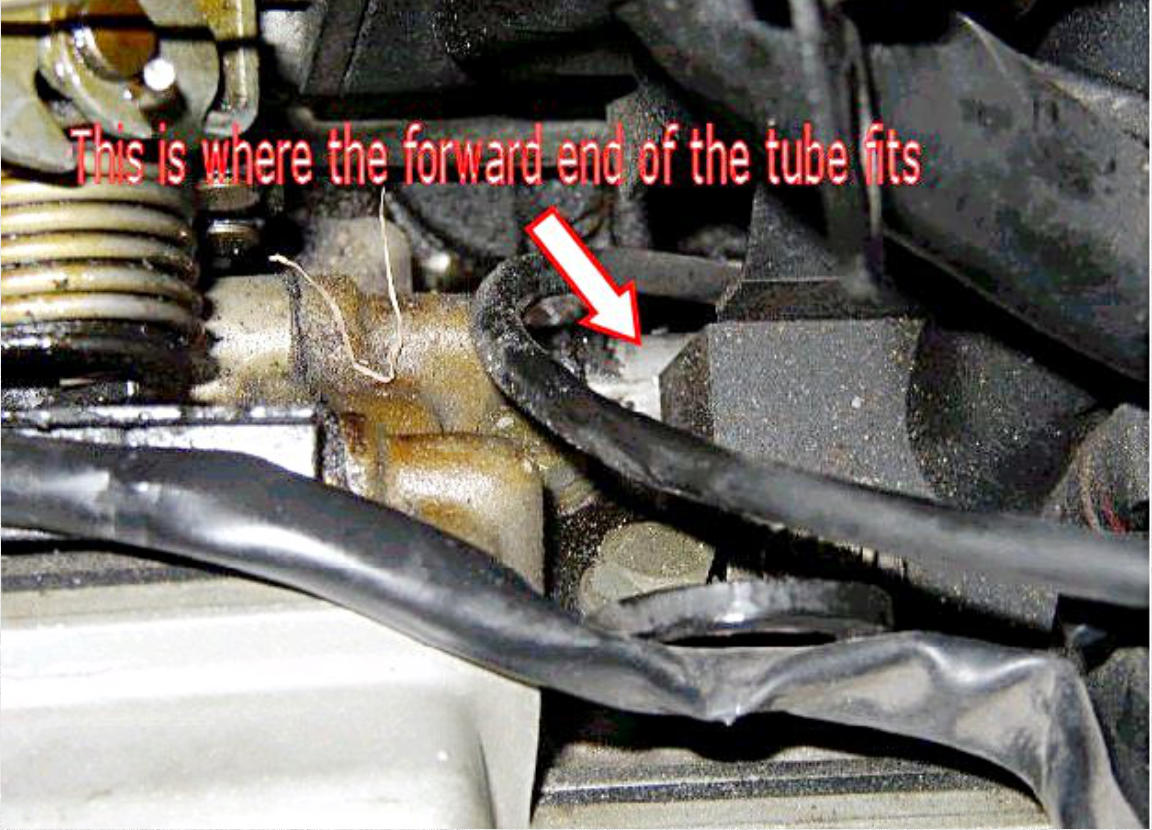
This last picture shows (but only just) where the other end of the aluminium vent pipe joins to the OSV (oil separator valve). This is right at
the front of the engine near the throttle-return spring looking from the left-hand side of the engine bay. Right in the centre of the picture and
framed by the smaller of the looms is the crankcase breather outlet. Make sure that the aluminium pipe is reasonably tight on this outlet and
that the 'O' ring is fitted to the inside bore of the aluminium tube, the tube can slide backwards and forwards on this outlet to enable the PCV
to be lifted straight upwards....don't let it drop off like I did!...... On the M62TUB engine this is replaced with a short section of flexible
pipe which can rupture and split - unfortunately access is only possible with the removal of the manifold.
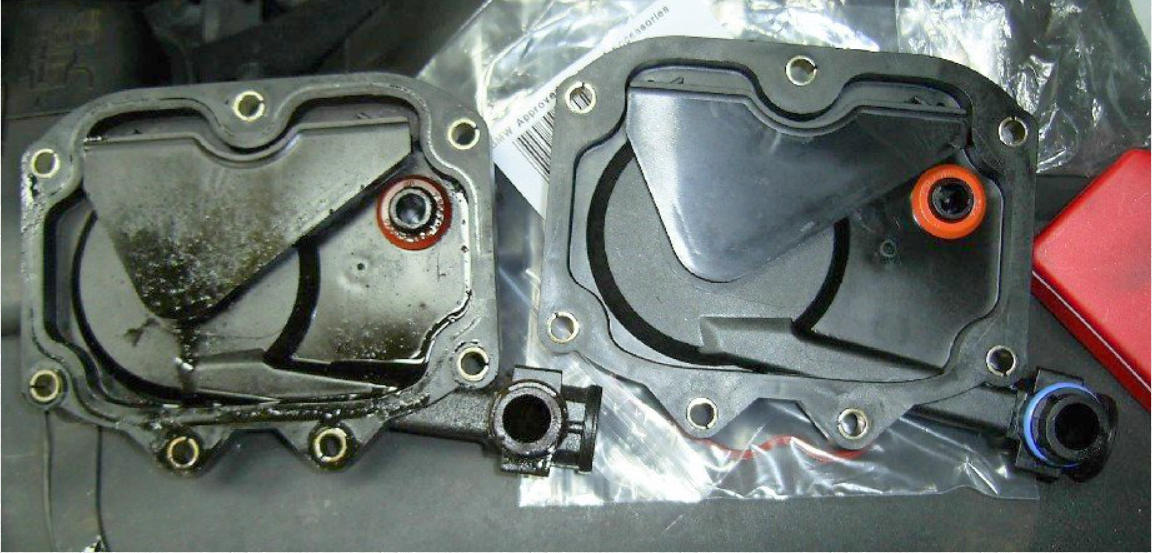
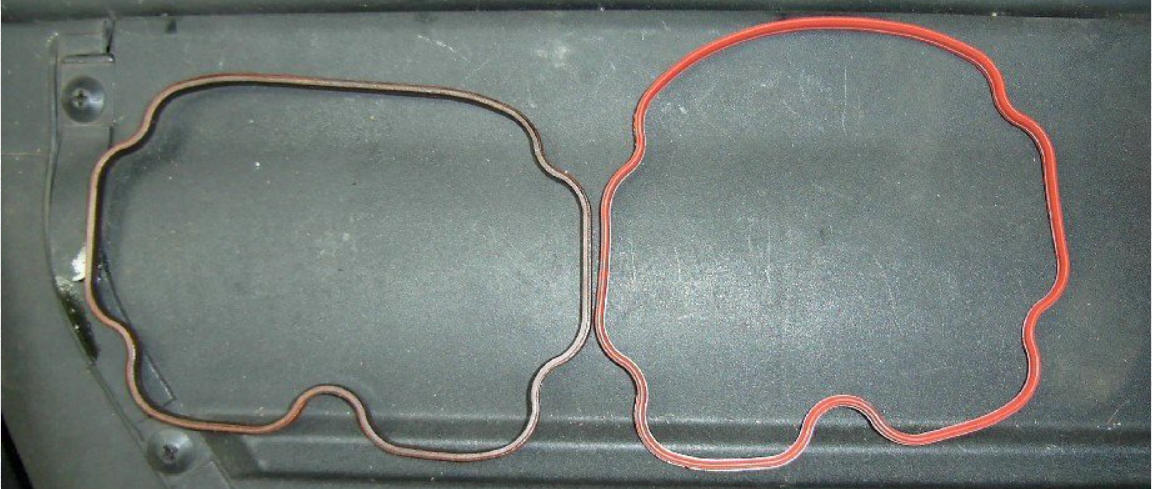
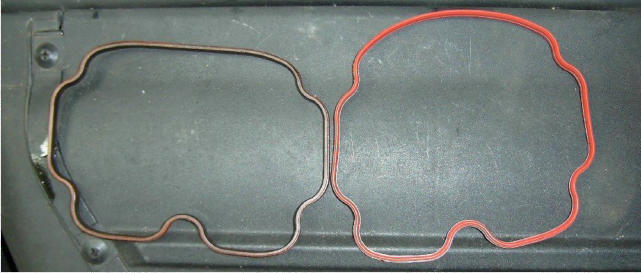
Reassembly is just a reversal of the process as they say....fit a new gasket to the PCV and stick a bit of silicone grease around it for good
measure. Note that the M62 manifold has an internal vent pipe that needs to be fitted to the PCV during reassembly


Lose the rest of your knuckles doing back up the Torx bolts on the PCV....or, use Hex bolts instead as shown here:
do them up loosely to start with, the housing needs jiggling around to get each bolt in. Line up the aluminium tube on the PCV
and use a screwdriver to push the tube from the front end of the car towards the housing (not forgetting to grease the 'O' ring on each end
first). It is also easier (unless you are left-handed) to get a helper to push the tube from the front while you guide the tube over the PCV
'O' ring as it is quite a snug fit. Everything else is straight forward but just remember a couple of things: The coolant expansion tank loom
goes behind the tank and up through the middle between the bulkhead and the centre of the tank. The coolant tank nuts are made of
plastic and are self-tapping, don't do them up too tight. Be careful with the insulation behind the PCV to ensure this does not squash the
vacuum pipe that runs between the fuel pressure regulator and the PCV.
That's it all done...time for a cup of tea......Tim....
P.S. I’ve been asked a number of times why I don’t just remove the manifold as this makes access much easier - the reason is that I will do
as much as I can to leave the manifold where it is, and that is because the age of these cars means that the looms are getting old and
brittle. I have a quick fix for the manifold gaskets here for just that reason. I would hate to be trying to find out why one injector has
stopped working or one spark plug is not producing the correct HT voltage due to failure of the loom. I removed the manifold on my M60
730i and decided it wasn’t a ‘good idea’ and have avoided it ever since.

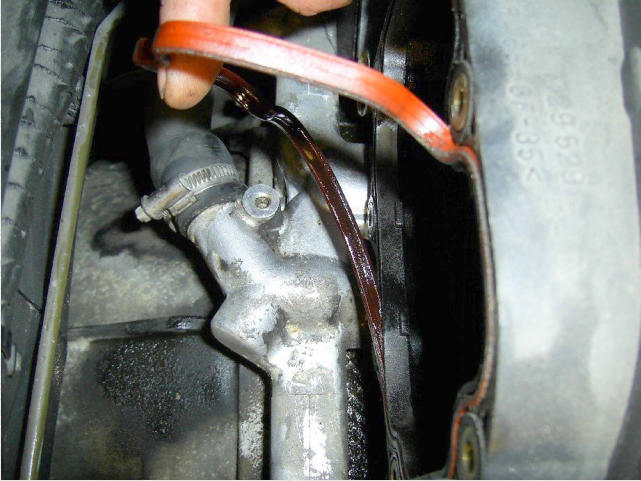
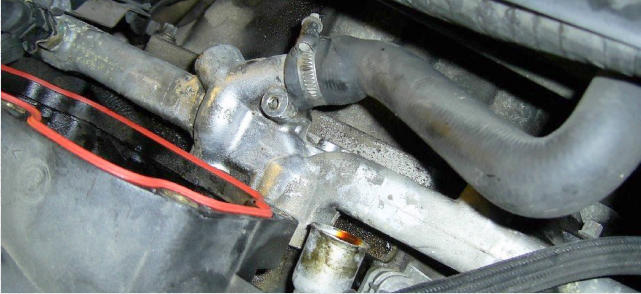
While we are in there - the coolant pipe shown below looks like it’s on its last legs, this is the famous exploding coolant pipe - you might
as well replace it while you have the room to do it.


SEARCH MEEKNET

SEARCH MEEKNET
Other Vacuum Leaks
Other Vacuum Leaks
Timm’s BMW M60 and M62 Engine PCV
Valve Replacement ( E31, E32, E38 and E39)
The M60, M62 and M62TUB V8 engines used in the E31 840i, E32, E38 and
E39 all suffer from PCV valve failure when they reach a certain age. The
PCV is a pressure regulating valve for the crankcase - it keeps the
crankcase at a constant vacuum of a few millibars and is fitted to the rear
of the inlet manifold. When this is damaged it can cause erratic idling, a
howling noise from the rear of the engine, oil leaks from the valve covers
and excess smoke. Often mistaken for Nikasil problems on the M60 engine
the repair is pretty straight-forward but does require a bit of patience
especially when trying to get the Torx bolts out of the PCV. More
information can be found here.
Start the repair by removing the plastic engine covers, the fixings are
found underneath the small covers and are all 10mm nuts. Start with the
top cover and then remove the side covers. The E38 has push-buttons
instead of 10mm nuts.
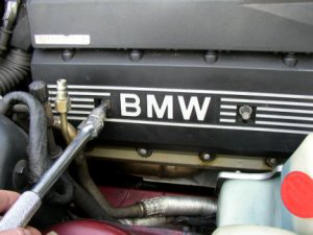

Remove the soundproofing from the top of the manifold....

ADDITIONAL STAGES FOR BMW E31 8-SERIES
Remove microfilter housing by removing central conical nut and then
removing 2 x 7mm self-tapping screws
E32 only: Access to the nut that holds the coolant tank is obstructed by
the diagnostic connector so remove the cover along with the security
strap, loosen the big plastic nut and drop the connector down enough to
get to the nut (10mm plastic self tapper). Disconnect the pipe that
connects to the right top of the expansion tank (push fit), undo both
plastic nuts and move the tank off to the left hand side of the engine bay
(no need to drain the coolant).
Disconnect the large loom that goes to the right hand wiring bank above
the injectors and unclip the loom from this mounting just above the PCV.
Remove the squashy-rubber insulator from behind the PCV, it's a bit
fiddly but it comes out quite easily without tearing it (found on E32
only). The picture also shows the vacuum pipe that runs from the fuel-
pressure regulator to the PCV, I have replaced this pipe as the old one
was damaged, squashed and had a hole in it....
The diagram below shows the manifold and PCV valve at the rear. You can
see the Torx bolts (6) than need to be removed. This is the most tricky
part as there is little access to the bolts. There are small differences
between the PCV and manifold on the M60 and M62 (the picture below is
for the M60) but removal and replacement is essentially the same except
there is an internal vent pipe that needs to be fitted to the PCV
during replacement:
Right, we’re ready for the tricky bit, removing the six Torx bolts (there
has been some discussion if these bolts are actually Ribe and not Torx,
but, a T30 Torx fits perfectly. It is extremely important that the Torx
driver you use is of good quality, it must fit tightly in the bolt - if
there is any play at all the heads will strip - don’t just have a go
with a worn driver, they will not come out and you will damage the
bolt
The lower-left bolt (on the E32) could only be undone using a
pair of mole-grips holding the Torx bit (don't try a spanner,
the bit drops out and you won't find it again).....

The picture below shows the clip that holds the breather pipe to the PCV,
lever this upwards using a short screwdriver while holding on to it, you
won't want to lose this between the cylinder heads....The clip is slightly
different on the M62TUB. The picture also shows an additional pipe that is
fitted to the new PCV, this needs blocking off on the 730i's but is used on
the cars that have a vacuum brake booster for the brake system, I used a
blind grommet which fitted snugly which was then covered in heatshrink
and shrunk in position for security...
EDIT: Quite a few people have had problems getting the Torx screws out
from the PCV. The most important point is to use a quality Torx bit. It
must fit tightly in the head of the bolt, if it wiggles around you have very
little chance of getting a good enough purchase on the bolt. Only put
pressure on the bit when it is properly seated, too little pressure and the
Torx will round off. f you are in a situation where you just cannot get the
Torx bolt out (if, for instance, the Torx head is damaged) then there are a
number of possibilities. Most successful so far seems to be to melt the
PCV using an old soldering iron so that access can be made to the errant
Torx bolt (this is usually the one at the bottom at the passenger side).
Melt enough away so that you can get a drill in there........drill a hole
across the bolt and fit a self-tapper in the hole. Then use a pair of Mole-
grips to turn the head of the bolt.
I have heard of people whacking the PCV into submission but be warned
that the manifold is made of the same material and may well give up at the
same time. The Torx bolts are sleeved which means that even after you
have completely demolished the PCV you will still be left with a Torx bolt in
a sleeve. I'm always happy to hear of your own method of getting these
bolts out......my best tip is: Buy a brand new high quality Torx bit....for a
fiver you are at an advantage to start with.....
This last picture shows (but only just) where the other end of the
aluminium vent pipe joins to the OSV (oil separator valve). This is right at
the front of the engine near the throttle-return spring looking from the
left-hand side of the engine bay. Right in the centre of the picture and
framed by the smaller of the looms is the crankcase breather outlet. Make
sure that the aluminium pipe is reasonably tight on this outlet and that
the 'O' ring is fitted to the inside bore of the aluminium tube, the tube can
slide backwards and forwards on this outlet to enable the PCV to be lifted
straight upwards....don't let it drop off like I did!...... On the M62TUB
engine this is replaced with a short section of flexible pipe which
can rupture and split - unfortunately access is only possible with
the removal of the manifold.

Reassembly is just a reversal of the process as they say....fit a new gasket
to the PCV and stick a bit of silicone grease around it for good measure.
Note that the M62 manifold has an internal vent pipe that needs to
be fitted to the PCV during reassembly

Lose the rest of your knuckles doing back up the Torx bolts on the
PCV....or, use Hex bolts instead as shown here:

do them up loosely to start with, the housing needs jiggling around to
get each bolt in. Line up the aluminium tube on the PCV
and use a screwdriver to push the tube from the front end of the car
towards the housing (not forgetting to grease the 'O' ring on each end
first). It is also easier (unless you are left-handed) to get a helper to
push the tube from the front while you guide the tube over the PCV 'O'
ring as it is quite a snug fit. Everything else is straight forward but just
remember a couple of things: The coolant expansion tank loom goes
behind the tank and up through the middle between the bulkhead and
the centre of the tank. The coolant tank nuts are made of plastic and are
self-tapping, don't do them up too tight. Be careful with the insulation
behind the PCV to ensure this does not squash the vacuum pipe that
runs between the fuel pressure regulator and the PCV.
That's it all done...time for a cup of tea......Tim....
P.S. I’ve been asked a number of times why I don’t just remove the
manifold as this makes access much easier - the reason is that I will do
as much as I can to leave the manifold where it is, and that is because
the age of these cars means that the looms are getting old and brittle. I
have a quick fix for the manifold gaskets here for just that reason. I
would hate to be trying to find out why one injector has stopped working
or one spark plug is not producing the correct HT voltage due to failure
of the loom. I removed the manifold on my M60 730i and decided it
wasn’t a ‘good idea’ and have avoided it ever since.
Big thanks to GarethF for the additional E31 pictures


While we are in there - the coolant pipe shown below looks like it’s on its
last legs, this is the famous exploding coolant pipe - you might as well
replace it while you have the room to do it.

SEARCH MEEKNET


SEARCH MEEKNET
Other Vacuum Leaks